
Waitlist
Turn a full calendar into a waiting list, then fill every cancellation — offer slots by hand or let the system chase replies for you.
Updated 19 July 2026
When you are fully booked, the customers who walk away are lost revenue — and the cancellation you get an hour later is an empty slot nobody fills. The waitlist captures those would-be customers, then hands you (or the system) a one-tap way to put someone into the gap the moment it opens.
You run it from Bookings → Waitlist in the left navigation. Customers add themselves from your booking page when they hit a fully booked service, so the list fills on its own once you switch it on — there is no button to add someone by hand. Joining (and later accepting an offer) requires the customer to be signed in to an account — a walk-in can't join anonymously, since accepting later needs to look up their saved payment details automatically.
Open in app: Waitlist
How the page is laid out
The page is built around one question: does anything need you right now?
- Status line (always visible) — a single calm line shows how many people are waiting, how many offers are out, and whether anything needs your attention. When nothing does, it says so plainly: "nothing needs you."
- Needs you zone (only when action is required) — if an offer expired with no one left to try, or a customer is waiting in manual mode and hasn't been offered yet, those entries appear here with a plain-language reason and one-tap inline actions. The zone is hidden when everything is running on its own.
- Waiting pool (collapsed) — the full list of all waitlist entries lives below the Needs you zone, collapsed by default. Expand it to browse, filter, or manage individual entries.
The sidebar badge next to Waitlist in the navigation shows only the number of entries that need your action — it turns red when something requires you, and disappears when everything is being handled automatically. It no longer shows the total number of people waiting.
Switch it on so customers can join
Open the gear icon in the top right to reach Waitlist Settings, then turn on Enable Waitlist. From that point a customer who hits a fully booked service is offered the choice to join instead of leaving. Until it is on, the page stays empty and shows a Waitlist is disabled prompt with a shortcut back into settings.
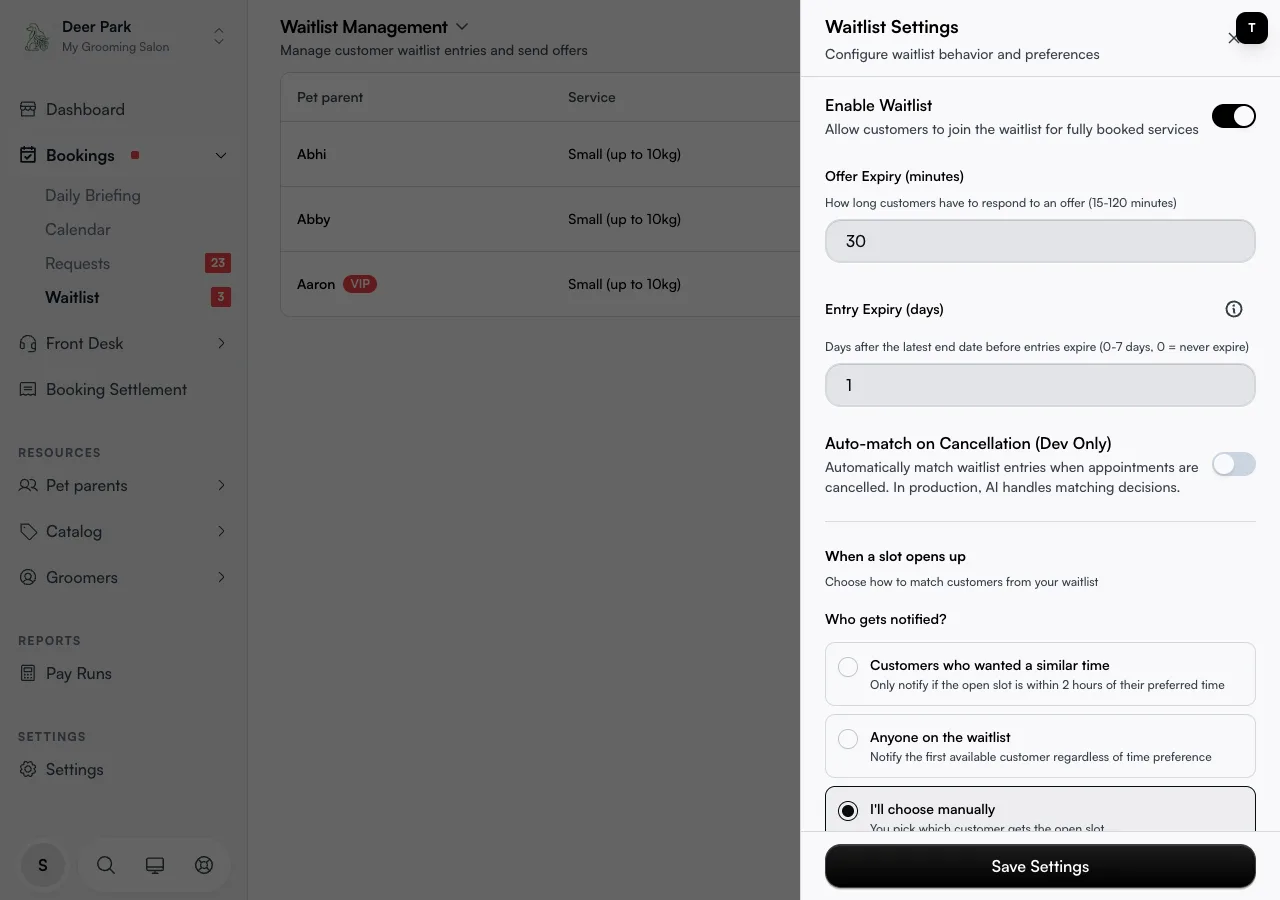
While you are here, set two timers:
- Offer Expiry (minutes) — how long a customer has to reply before the offer lapses and moves on. Default is 60; the range is 15 to 120.
- Entry Expiry (days) — how many days after a customer's requested window has passed before their entry drops off on its own. Default is 1, the range is 0 to 7, and 0 means entries never expire — handy if you would rather clear them yourself. The small info icon next to it opens a worked example of how the count works. Entries that have passed their window plus the grace period are removed automatically within about a minute — you will no longer see them lingering on the list for hours.
Click Save Settings. If you type a number outside the allowed range, the save is blocked with a message telling you the limits.
Act on entries that need you
When the Needs you zone is visible, each card in it shows:
- Who is waiting — the customer's name and which profile or pet the entry is for.
- What they want — the service.
- Why it needs you — a plain-language reason, for example "Offer expired, no one else in line" (for sequential mode after the cascade ran out) or "All offers expired, slot still open" (for broadcast mode) or "Waiting, never offered (manual)" (for manual mode).
- How long it has been waiting — the time since the entry entered the Needs you state.
- Inline actions — one or two buttons appear directly on the card: Re-offer (sequential mode), Re-broadcast (broadcast mode), or Send offer (manual mode). A quieter Remove button lets you cancel the entry if the slot is no longer right for them.
Tapping anywhere on the card (other than the action buttons) opens the full entry detail drawer.
Fill a freed slot yourself
For entries in the Waiting pool, click a row to open the customer's details — their contact info, the time window they asked for, the services and total price, any preferred staff, their notes, and how many people or pets the booking is for. If their service uses factor pricing (size, coat type, and similar) and they answered those questions when joining, the exact selections they made — for example "Dog size: Large" — show right under the service so you know what you're quoting before you even open the booking form. Entries that joined before this existed, or that don't use factor pricing, simply show no extra line here. To offer them a slot, use the three-dot menu on the row for Send Offer, or open the row and use the Send Offer button.
Pick the exact time you offer — not just their preference
The detail panel does more than send a blanket offer. Under Offer Time you get a start and end picker, pre-filled from the customer's preferred time and the total length of their services, so the slot usually needs no editing. Adjust either field to offer a different time — for example, the customer asked for Tuesday morning but your real gap is Tuesday at 2pm. The offer goes out for the time you set, not a fixed guess.
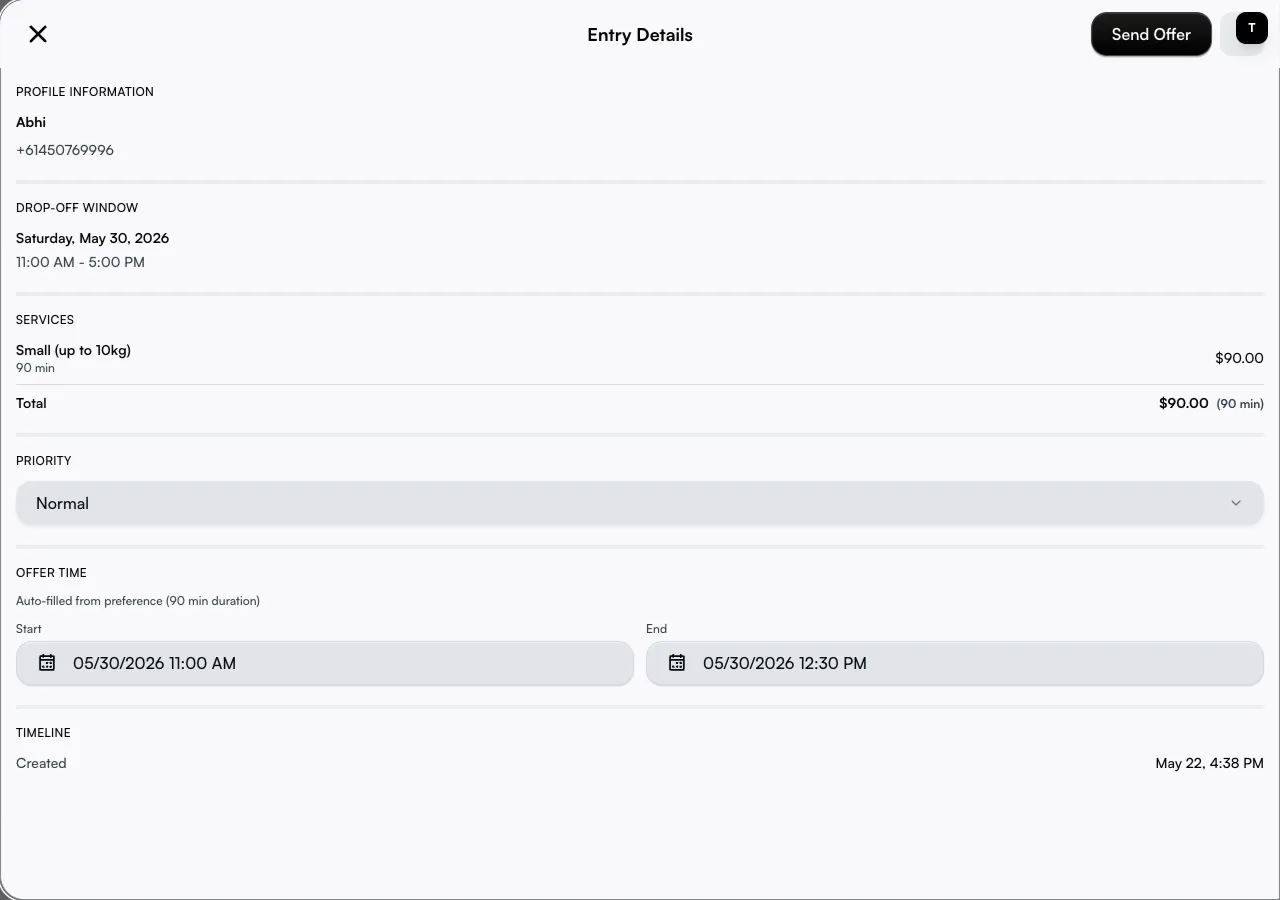
One offer at a time per customer: once an offer is out, a Pending Offer banner appears with the exact expiry time, and the Send Offer button is hidden until that offer is accepted, declined, or lapses. This stops you double-offering the same person.
Book them in directly — skip the offer
If you already know you're taking this customer, you don't have to send an offer and wait for a reply. Open the entry and click Book Now — it opens the same booking form you'd use for a walk-in or phone booking, pre-filled with their name, service, and preferred staff. Adjust the time or staff if you need to, then confirm: the appointment is created and confirmed immediately, with nothing for the customer to accept.
Book Now stays available even with an offer already out. Unlike Send Offer — which hides once an offer is pending — Book Now works any time the entry is active or paused, so you're never stuck waiting on a reply once you've decided to just book them.
If their service uses factor pricing (size, coat type, and similar) and they gave you those details when they joined the waitlist, the booking form arrives pre-filled with them. If not, you fill them in yourself, the same as any other manual booking.
Guests can be booked this way too — a customer who joined without creating an account can still be booked directly, since you're the one doing the booking, not them.
Once you confirm, the entry leaves the pool as Booked and any offer still pending for that customer is cancelled automatically.
Bump a customer up the queue
Open a customer's row and change their Priority — VIP, High, Normal, or Low. This is what your "who goes first" rules read from, so a VIP regular jumps ahead of a walk-in who joined earlier. Priority can only be changed before their first offer goes out; once you have offered them a slot the field locks so the queue order can't shift mid-offer.
Pause someone without losing their place
From the three-dot menu you can Pause Entry — they stay on the list and keep their spot, but no offers go to them until you Resume Entry. Use it when a customer says "not this week, but keep me on." Cancel Entry removes them for good. A paused entry shows as Closed until you resume it.
Find one customer in a long list
The Filters button (funnel icon) opens controls most owners never touch. You can search by name, email, or phone, narrow by Status (only active entries show by default — tick Select all to see closed and paused ones too), filter by Priority, and set a Date Range to show only customers waiting for a particular window. The list pages 20 at a time, and the refresh button pulls in anyone who joined while you were looking.
Let the system fill gaps for you (higher plans)
If your plan includes it, the settings panel adds a When a slot opens up section that sends offers automatically. If you don't see it, your plan covers manual offers only — you can still run the whole list by hand. Configure this once and the system runs itself.
The Auto-match on Cancellation toggle is the single control for automatic vs manual matching:
- Toggle on — the system automatically offers freed slots to customers whose preferred time windows include it. Every customer's precise preferred windows (set when they joined) are the matching gate; no other time-targeting setting is needed.
- Toggle off — nothing goes out on its own. You send every offer by hand.
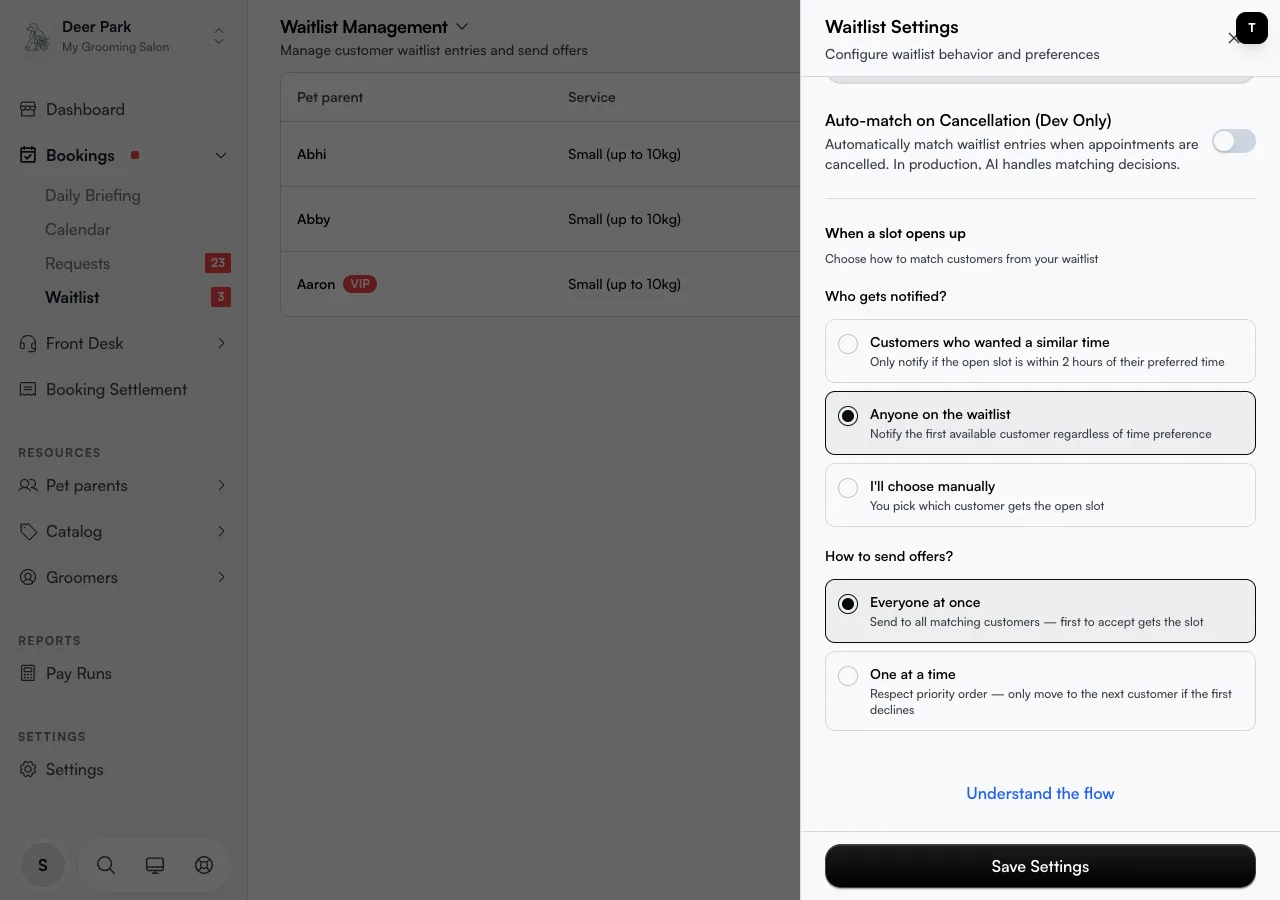
With auto-match on, How to send offers? appears — Everyone at once (all matching customers get it, first to accept wins, fills fastest) or One at a time (offered in order, only moving on when someone declines or lets it lapse). Choose One at a time and a final Who goes first? control appears:
- Highest-value first (default) — the customer whose booking is worth the most is offered first.
- VIP customers first — VIP-priority entries go to the front regardless of value.
- Whoever joined first — strict first-in-line order.
- Whoever waited longest — customers who have been waiting the longest get priority.
The Understand the flow link draws out exactly how your chosen combination plays.
The Auto-match on Cancellation toggle (the same one described above) also controls whether matching runs when an appointment is cancelled.
How is the slot accepted?
Choose whether customers confirm before the booking is made:
- Customer confirms (default) — the system sends an offer and the customer taps to accept. The slot is held for up to 15 minutes while they complete checkout. This is the safest option — no booking without their explicit agreement.
- Book automatically — the system books the slot for the next eligible customer without waiting for confirmation. Use this only if customers are comfortable with surprise bookings on their behalf.
Advanced auto-fill settings
Open the Advanced section (collapsed by default) to fine-tune how the matcher behaves:
- Overflow tolerance (minutes) — how far a job can run past the freed gap and still be offered, by shifting later bookings out. Default is 15 minutes. Set to 0 to require an exact fit. The system never moves bookings earlier, only later.
- Bin-packing (on by default) — when multiple smaller waitlisted jobs could fit in a freed gap, the system fills as many as possible from the gap rather than leaving it partially empty. For example, a 60-minute gap can be filled by two 30-minute customers.
- Notification cooldown (hours) — prevents the same customer from receiving offers too frequently. Default is 6 hours. A customer who declined an offer earlier in the day won't be re-notified until the cooldown passes.
- Minimum lead time (hours) — slots starting sooner than this are skipped during auto-fill. Default is 2 hours. Prevents notifying customers about a slot that starts in 20 minutes when they can't reasonably make it.
See — and optionally auto-fill — a hidden slot a customer already wants
If you use Hard or Adaptive slot limits (under Schedule settings) to intentionally show customers fewer times than are truly free, a waitlisted customer's exact requested time can quietly become bookable without ever showing up as "needs you" — because nothing on your calendar changed, the slot was just never surfaced.
A Bookable now badge appears next to any entry — in the Needs you zone, the Waiting pool table, and on mobile — whose requested time is genuinely free right now but not currently shown to customers. It updates live: if the slot fills before you act, the badge disappears next time you look. On its own the badge does nothing — it's a heads-up, not an action.
Auto-offer hidden slots, in the same Waitlist Settings panel (available on every plan, not just the higher-tier auto-match section above), sends that offer automatically instead of waiting for you to notice the badge:
- Off by default. Until you turn it on, a "Bookable now" match only ever shows as the badge — you still send every offer yourself.
- Delay before offering (minutes) — how long to wait, once the slot is bookable, before sending the offer automatically. Default is 120 minutes (2 hours); the range is 60 to 1440 (1 hour to 24 hours). The delay gives a customer who'd happily take a slot that IS visible time to book it themselves first — it's there for the customer who specifically wants the one time you're not showing.
- Turning it on starts the delay fresh for every customer already waiting — it will not immediately fire a burst of offers for entries that have been sitting on your list for weeks.
- The automatic offer is identical to one you send by hand — same expiry window, same email, same checkout link. There's nothing new for the customer to learn.
How customers pick their preferred times when joining
When a customer joins the waitlist from your booking page, they can now choose multiple preferred time segments instead of a single date range. For example, they can mark "Monday mornings and Wednesday afternoons" as the windows they are available for, rather than a broad "anytime from Monday to Friday."
The system uses those segments when matching — a freed slot is only offered if it falls inside at least one of the customer's preferred windows. A customer who chose "Monday mornings only" will not receive an offer for a Wednesday afternoon slot, even if that slot would otherwise match their service.
If a customer does not specify segments, their full date range is treated as open availability, exactly as before.
What a customer sees when they accept
Opening the offer link signs the customer in automatically — they no longer need to already be logged in, or logged in with a matching email, to accept. The link itself proves who they are, the same way a login code would, so tapping it takes them straight to their offer with no login step in the way. If they happened to be logged into a different account on that device, opening the link switches them into the offer's own account automatically — there's no more "wrong account" dead end.
Accepting an offer is usually a single tap. If nothing else is owed — a card is already on file (or not required) and no signature is outstanding — the appointment is created immediately and a "You're booked" confirmation appears right there on the same page, with no extra checkout page at all.
If something is still needed, it all happens on that same offer page too — there is no separate checkout or review page to navigate to. A card field appears and the Accept button stays disabled until it's filled in, or a sign-here step opens the moment they tap Accept if you require a digital agreement before booking, or both, one after the other. Once everything is in place, the same confirmation appears in place — the customer never leaves the offer page, with an optional "View my booking" link if they want to jump straight to it.
Waitlist bookings always confirm instantly, even with Manual Approval on. If your business normally requires you to approve every booking by hand (see Appointment settings), a waitlist accept skips that queue — the customer already chose this specific slot by accepting the offer, so it goes straight onto your calendar as confirmed rather than landing in your requests list.
The offer is held for 15 minutes (or until it expires, whichever comes first) while the customer completes any outstanding step. If they abandon the page, the hold lapses and the offer can be accepted by someone else.
Accepting always finishes on this one page — there is no case that sends the customer through the full booking flow instead. If a factor-priced entry's answers genuinely can't be resolved (a rare upstream data gap), the customer sees a calm message asking them to contact you directly rather than being handed a form to fill in. If a booking would run slightly past the time you offered, it still books automatically as long as the slot is actually free for the true length — the customer only sees a message if it truly can't fit, again pointing them to contact you.
Going back doesn't lock a customer out of their own offer. If a customer navigates away mid-step (before finishing a card or signature) and then reopens their offer link, they land right back on the same offer page and can still accept it — their own in-progress hold never blocks them.
A second recipient sees an honest "being reviewed" message, not a broken button. In broadcast mode, several customers can get the same offer at once. If someone opens the link while another recipient is already mid-accept, they see a calm "this offer is currently being reviewed by another recipient — check back shortly" message instead of an Accept button that would just fail. Once the hold lapses (or the other recipient completes or abandons it), the offer becomes acceptable to them again.
Factor-pricing (attribute-based) services are fully supported. If your service uses factor pricing — where the price depends on answers like pet size or coat type — customers can be offered and accept a slot just like any other service. When a customer accepts, their answers are resolved from their existing profile automatically, so the booking goes through with the correct price and duration without asking them again — factor questions are never asked again on the offer page. In the rare case their profile answers can't be resolved, they see the same "please contact the business" message rather than a form to fill in.
Tips
- A calm badge is good news. The sidebar badge only lights up red when something needs your action — no badge means the system is running on its own and the pool is either empty or being handled automatically.
- The Needs you zone tells you exactly what to do. Each card shows a plain-language reason and the right action for your mode (Re-offer, Re-broadcast, or Send offer). You don't need to hunt through the full list.
- Nothing sends itself while Auto-match is off. That is the default for every business — turn it on if you want slots to fill hands-free.
- You can't re-offer a customer with a pending offer. The Send Offer button stays hidden until their current offer is accepted, declined, or expires — check the Pending Offer banner for when it lapses.
- Priority locks after the first offer. Set VIP or High before you send, or the field greys out.
- Set Entry Expiry to 0 only if you clean the list yourself — otherwise stale entries for dates that already passed pile up and clutter the queue. Expired entries are removed from the active pool within about a minute once their window plus grace period passes.
- Bin-packing fills more gaps. If you have a busy waitlist with many short services, leaving bin-packing on means one cancellation can convert to two or three bookings instead of one.
- Overflow tolerance is not infinite. The system only shifts bookings later, never earlier. If the customer behind the freed slot has a hard time they can't move, the overflow won't apply even if the tolerance allows it.
- Auto-book silently books customers. Use it only for businesses where customers expect it — for example, a recurring drop-off service where the customer just wants the next available slot.
- If a customer swears they never saw an offer, check the email address on their entry — offers are sent by email, so a wrong or missing address means nothing arrives.
- If a customer says accepting didn't work, they may have navigated away before finishing a card or signature step. Ask them to use the link in the offer email again — if the offer hasn't expired they can try once more.
- A "Bookable now" badge is only relevant if you use Hard or Adaptive slot limits. If you show customers every open slot, this badge will rarely if ever appear — there's nothing hidden to detect.
- Auto-offer hidden slots is a separate switch from Auto-match on Cancellation. You can run one without the other — for example, auto-offer hidden slots on (fill the exact-time insisters automatically) while cancellations are still triaged by hand.
- Book Now is for when you already have an agreement with the customer — a phone call, a message, an in-person chat. It skips the offer/accept step entirely, so only use it once you actually intend to put them in that slot; there's no confirmation step on their side to catch a mistake.
- A customer needs an account to join or accept. A guest can't complete either step — they need an account first. Joining still requires them to be signed in on your booking page. Accepting an offer is different: the emailed link signs them into their own account automatically, so if someone says accepting isn't working, the account itself (not being signed in) is the more likely cause — check they used the link from their own offer email, not a forwarded one.
- Waitlist bookings bypass Manual Approval by design. Don't expect a waitlist accept to show up in your appointment requests queue even when Manual Approval is on for regular bookings — it always confirms straight away.
Related
- Appointment calendar — where an accepted offer lands as a real booking.
- Appointment settings — buffer time and booking rules that shape which slots open up.
- Appointment requests — your other approval queue when manual approval is on.