
Payments overview
Take money on a booking, add a service, product, or discount to the bill, adjust a line price, send a receipt, close the day, and pay your team.
Updated 19 July 2026
You need a finished appointment to become money in your account, a closed day, and pay for your team — without juggling a separate till and accounting tool. This page is the map: where each step happens, plus the controls most people never find until something goes wrong.
Money moves one way: you take payment on each booking, you close (settle) each trading day, then you run pay for your team. Connect accounting and the books update on their own.
Open in app: Pay overview · Booking Settlement
 Take payment        Close the day        Pay your team
 (on the booking) ─► (Booking         ─►  (Pay Runs)     ─► Xero
                      Settlement)                           (optional,
   collect from        lock the day's       review + send     automatic)
   the customer        takings              to your team
Take payment on a booking
There is no separate "take a payment" screen — you charge from the booking itself.
- Open the booking from the calendar to bring up its detail panel.
- Once the visit is done, start checkout. Seglo works out what's owed — service price, minus any discount, deposit, or gift card already applied.
- Pick how the customer pays. The methods you see depend on what you've connected (see Payment methods).
The four methods, in the order they appear: Tap to Pay on iPhone, Cash, External card terminal (for a card machine you already use — Seglo just records that it was paid by card), and Card on file. The on-file card option stays greyed out with "No card on file" until the customer has saved one.
Change a line price before you charge
Tap the price on any service line in the bill summary to adjust it — handy for a same-day deal, a rush surcharge, or fixing an odd price. On desktop a small dollar box opens in place; on mobile a sheet slides up titled Adjust price.
Type the new amount and confirm. You can go higher or lower, right down to $0 for a complimentary service. Once changed, the original price shows struck through next to the new one, and the total updates at once. To undo, tap the reset arrow to return the line to its catalogue price.
Anyone who can open checkout can adjust — no special permission — and every change is recorded so it shows up in your reports. The price you set is the exact amount charged on every method, including Tap to Pay and card on file; nothing recalculates from the catalogue at the moment of charge. Adjusting only works on a single booking's service lines — group bookings and product lines stay read-only.
Add a service, product, or discount to the bill
Open + Add to bill — it sits in the bill summary both on a booking's detail view (open any booking from the calendar) and inside checkout — and pick what you're adding:
- Service — search or browse the catalogue and tap one to add it. A service priced by an attribute (like dog size or coat condition) opens a quick question step first — answer it and Seglo shows the live price before you confirm, so the line is added at the correct price, not the base rate.
- Product — search your retail products, set a quantity, and add it. Seglo checks your stock count first; if there isn't enough left, the add is blocked and nothing changes.
- Discount — tap a quick chip — 5%, 10%, 15%, 20% — or type your own percentage or a fixed dollar amount using the % / $ toggle. Attach a reason (from your saved discount reasons) and a free-text note up to 500 characters — both land in your reports so you can see why money came off. Already have a discount code? Tap Have a discount code? to switch to the code field instead. A discount already on the booking shows here with a remove button, so you're never stuck with one you can't clear.
Whatever you add shows in the bill summary straight away and the total updates immediately — on the booking's detail view as well as in checkout, not just at the till. Adding to the bill needs the same permission as editing a booking; a staff member without it can still see the bill in full but doesn't get the + Add to bill link.
Stage a product or a discount while you're still creating the booking
You don't have to save the appointment first. Start a New Appointment and once you've picked at least one service, a Products section and a Discount section appear below the profile cards, before Internal note:
- Products — tap Add (or Add another) to search your retail products and set a quantity, the same picker as Add to bill. A product staged here applies to the whole booking, not one person on it — Seglo attaches it to the primary appointment once you save.
- Discount — tap Add a discount. It opens straight to the promo code field (see Discounts and promo codes) — tap Cancel there to flip to the same %/$ manual discount, reason, and note form used in + Add to bill. A code and a manual discount are mutually exclusive, so applying one clears the other.
Both stage into the running total at the bottom of the form so you see the real number before you commit — Seglo re-prices every line and re-checks the discount the moment you save, so this total is a preview, not the final charge.
Changed your mind? Each service line in the bill summary has its own remove control — tap it and confirm to take that service back off the booking (the same permission as adding applies). A booking always needs at least one service — try to remove the last one and Seglo blocks it with an error; remove the whole appointment instead if that's what you need. Removing a service after payment works the same way the "fix up the bill" section below describes — it never quietly changes what was already collected.
Change or swap a service already on the booking
On your phone, open the booking and tap any service line in the bill summary to see what you can do with it.
- A fixed-price service opens a sheet with a Change service button in the top right to swap it for something else — there's nothing to edit on this kind of line, so removal stays the swipe gesture below rather than a button in the sheet.
- A service priced by an attribute (dog size, coat condition, and the like) opens straight to Edit options, showing the options currently selected, with the same Change service button alongside. Changing an answer re-runs the same questions — Seglo shows the new price and duration before you save. Change service replaces the line with a different item from your catalogue; swapping to another attribute-priced service asks its questions fresh, swapping to a flat-priced one adds it straight away at its listed price.
Saving keeps the booking's total, end time, and assigned staff member in sync automatically — the original line is updated in place rather than removed and re-added, so nothing about who's doing the work changes.
You can still swipe a service line to the side to remove it in one motion, on either kind of line.
This is on the Seglo app on your phone for now — on a computer, use the remove control and + Add to bill to make the same change in two steps. Either way, the same permission that lets you add or remove a service also controls editing, and it's turned off once a booking is paid, completed, cancelled, marked no-show, or settled.
Fix up the bill after it's already been paid
Add something to a booking that's already been paid, and Seglo never quietly changes what was collected — it surfaces exactly what to do next:
- Balance due (you added something after paying) — a Balance due $X banner appears with a Collect balance button. Tap it to open checkout charging just the extra amount, not the whole total again. On a booking checked out together with others in a group, the button is disabled instead — collect that balance from the group's own checkout.
- Refund due (you added a discount, or removed a service, after paying) — a Refund due $X banner appears. If the drop in total matches exactly what was paid, a Refund $X button appears (needs the refund permission) and opens the same refund control you'd use from the payment row. For anything less than a full refund, or for a team member without refund access, the banner is informational only for now — issue a partial refund manually through your payment provider, or have an admin action it.
An unpaid booking has nothing to reconcile — adding an item just updates the total, ready to be collected in full at checkout as usual.
Send the customer a receipt
After a successful payment, the success screen offers a receipt by email or text if the client has those details on file — each sends with one tap and confirms when it's gone.
There's also a QR code option most people miss: tap to reveal a code the customer can scan to open their receipt on their own phone, no contact details needed. That receipt lives at a public link, so a customer can reopen it later without logging in.
Close the day and read your takings
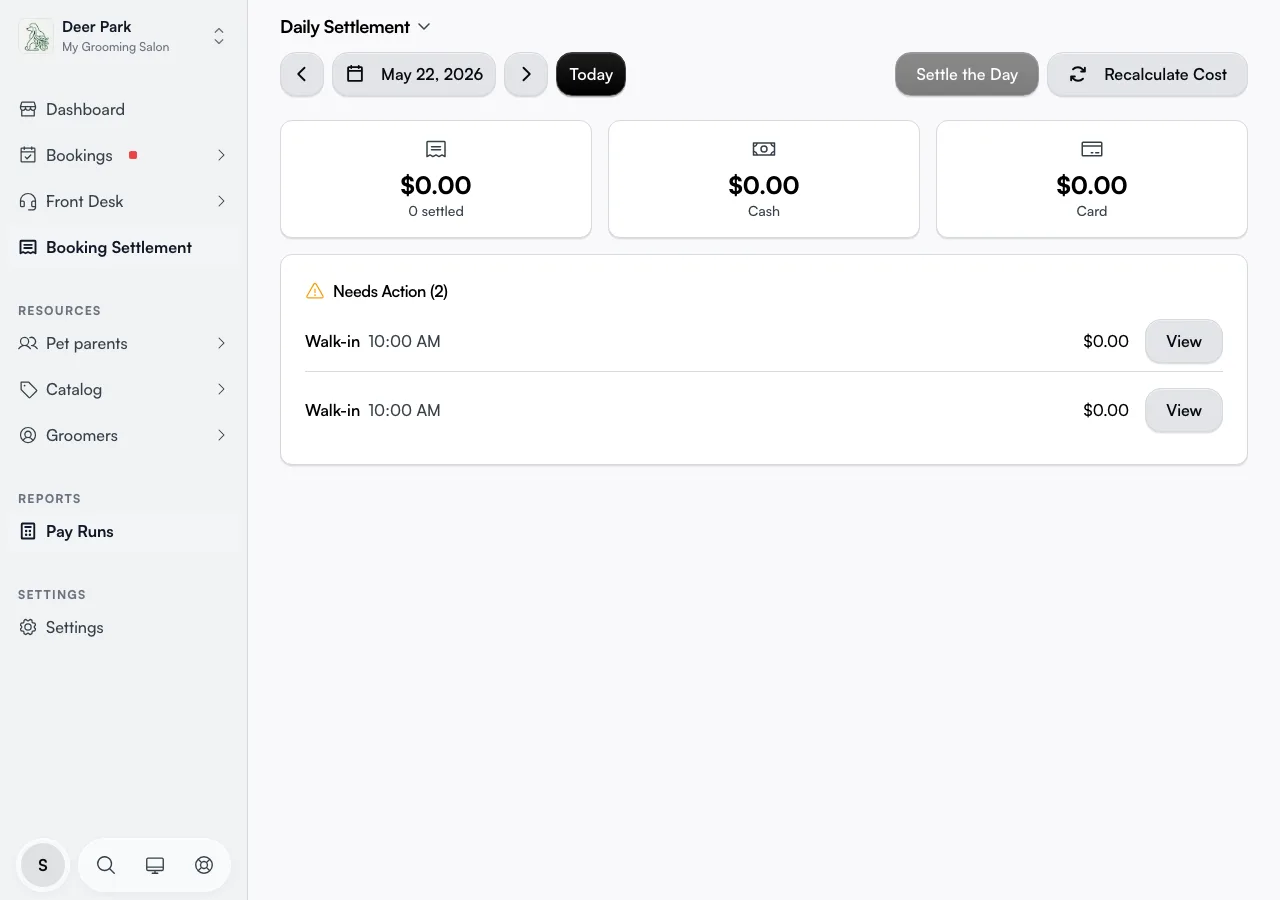
At the end of trading you settle the day under Booking Settlement (the page is headed Daily Settlement). Settling confirms every booking that day is paid, then locks the day so reports and pay are final.
The day report breaks your takings into settled revenue, cash, and card totals, plus a staff breakdown showing revenue and appointment count per team member. Two lists flag what's blocking you: Needs Checkout (bookings still to be paid — each has a Checkout button) and Needs Action (anything else to resolve). Clear both before the Settle the Day button activates.
Watch for these:
- You cannot settle a future date — the button stays disabled until the day has passed.
- Settling sends you a summary email automatically.
- Got it wrong? A settled day shows an Undo button. Reopening unlocks checkout for those bookings so you can fix and settle again. If you try to take payment on an already-settled day, checkout tells you the day is settled and to reopen it first.
Pay your team
Pay periods build up automatically on the schedule you set, so there's nothing to start by hand. When a period ends you review and finalise it under Pay Runs.
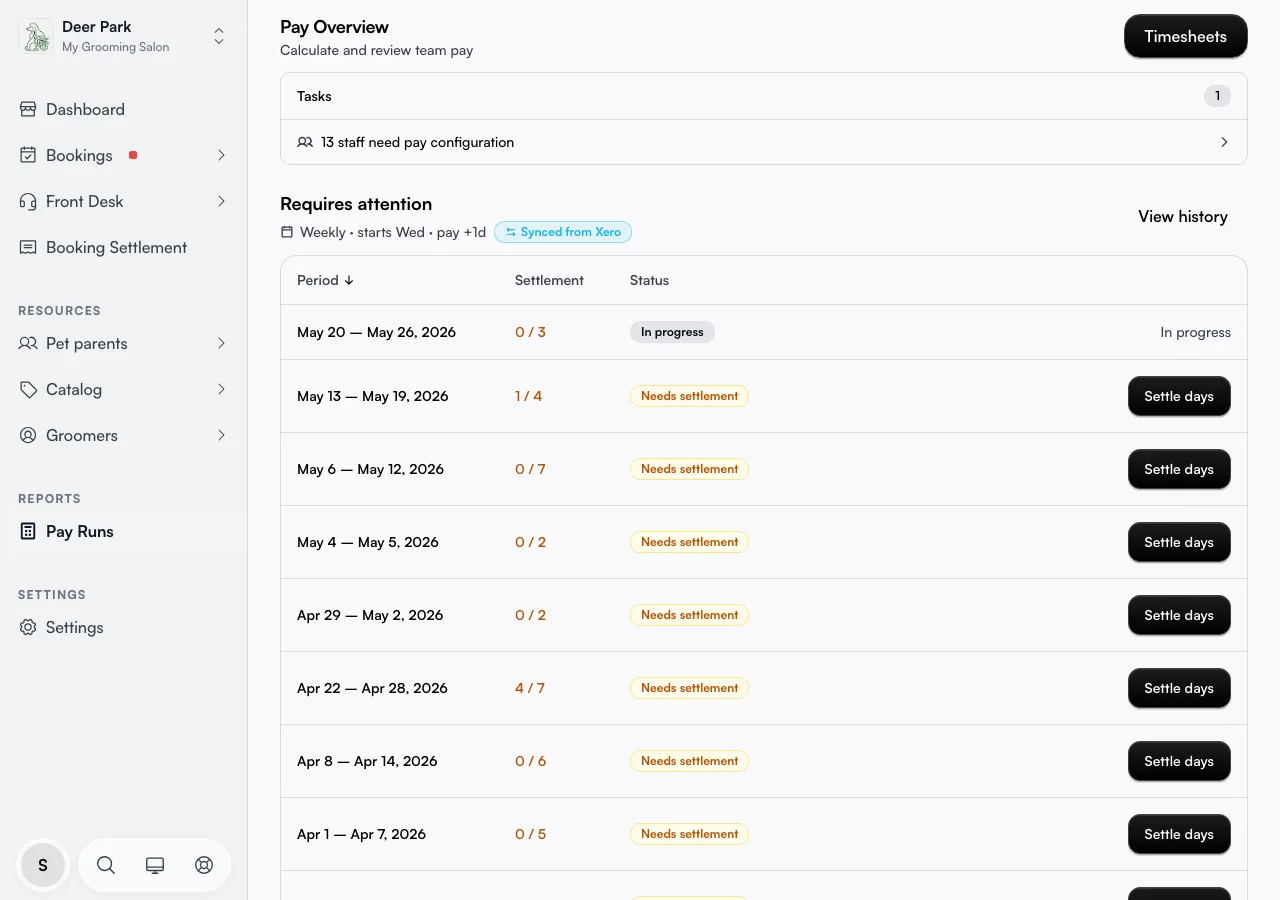
The Requires attention list shows only periods you can act on right now plus the one currently accruing — already-paid periods move to View history so the page stays focused. If a team member still needs pay details set up, a Tasks banner appears at the top with a one-tap shortcut to fix it. Haven't set a pay schedule yet? A short three-step setup guide appears in place of the list. See Finalising pay for the full routine.
Connect accounting so the books update themselves
Connect Xero once and settled days and finalised pay runs flow into your books on their own — no manual export. You set this up in your payment and integration settings.
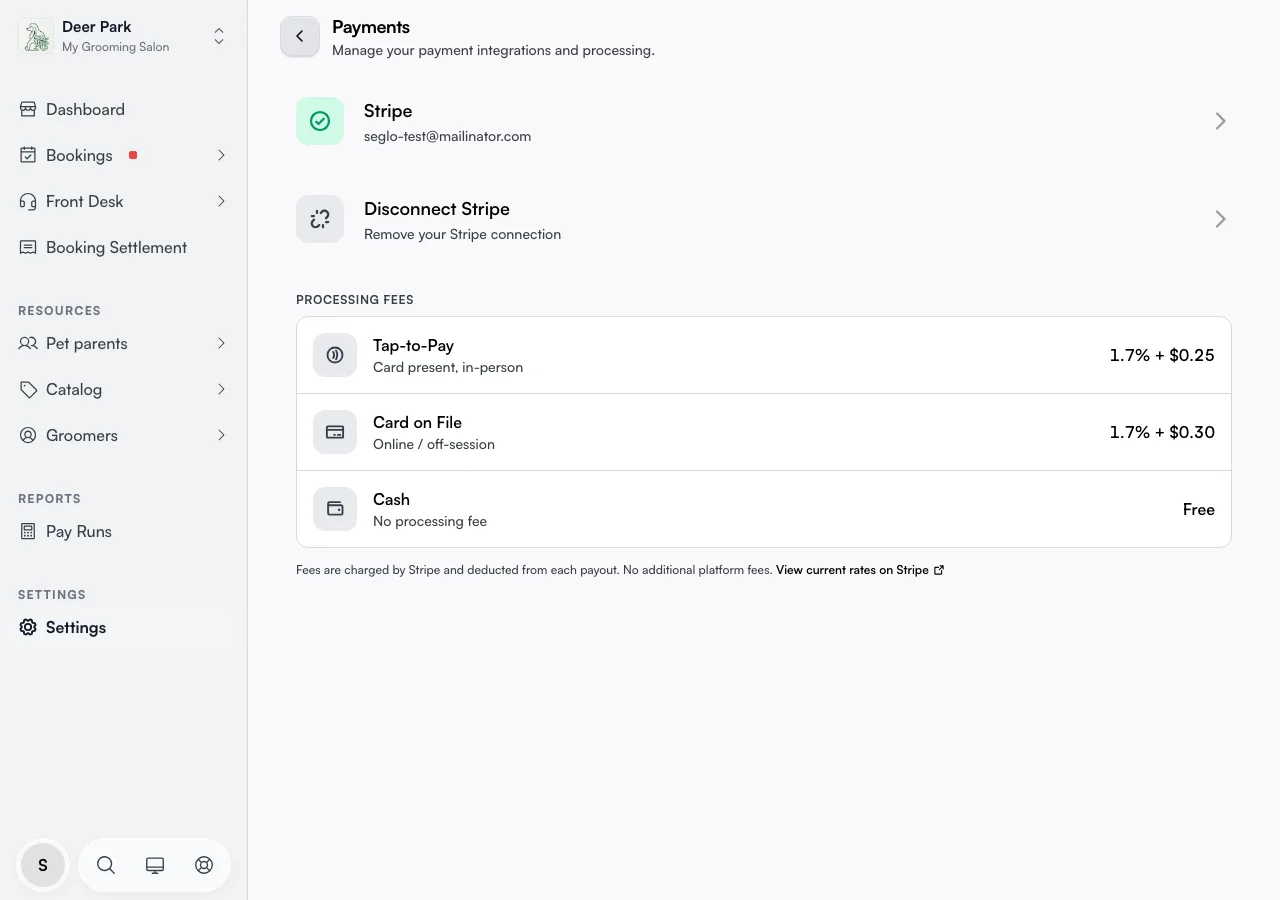
See Xero integration to link your organisation.
Tips
- Payment always happens on the booking. Open the appointment first — there is no standalone payments screen.
- An adjusted price is the price charged, everywhere. It overrides the catalogue across cash, card, Tap to Pay, and card on file — so double-check the line before you confirm.
- A pay period won't finalise until every day in it is settled. Settlement comes first, the pay run second.
- A settled day blocks checkout. If you need to take a late payment on a closed day, hit Undo on that day first, take the payment, then settle again.
- A "Refund due" banner with no Refund button means the amount doesn't match a full refund of what was paid, or you don't have refund access — the partial refund needs to be actioned manually (through your payment provider) or by an admin.
- Balance due but Collect balance is greyed out means the booking is part of a group checkout — collect that balance from the group's own checkout instead.
Related
- Payment methods — what your customers can pay with.
- Daily settlement — closing each trading day in full.
- Finalising pay — reviewing and locking a pay run.
- Xero integration — pushing payments and pay runs to your books.
- Products — setting up the retail items you can add to a bill.