
Staff schedule
Give your team hours so customers can book them — recurring shifts, one-off cover, breaks, leave, and the controls most owners never find.
Updated 19 July 2026
This is where you turn "who works here" into "who customers can actually book." Until a team member has hours on this page, no slots open up for them — and the moment you change their hours, the booking page and your AI assistant follow within seconds.
Open in app: Schedule
Add and configure your people first under Team members, then come here to give them hours. A shift alone is not enough — the person also has to be set as bookable and have at least one service skill, both covered below.
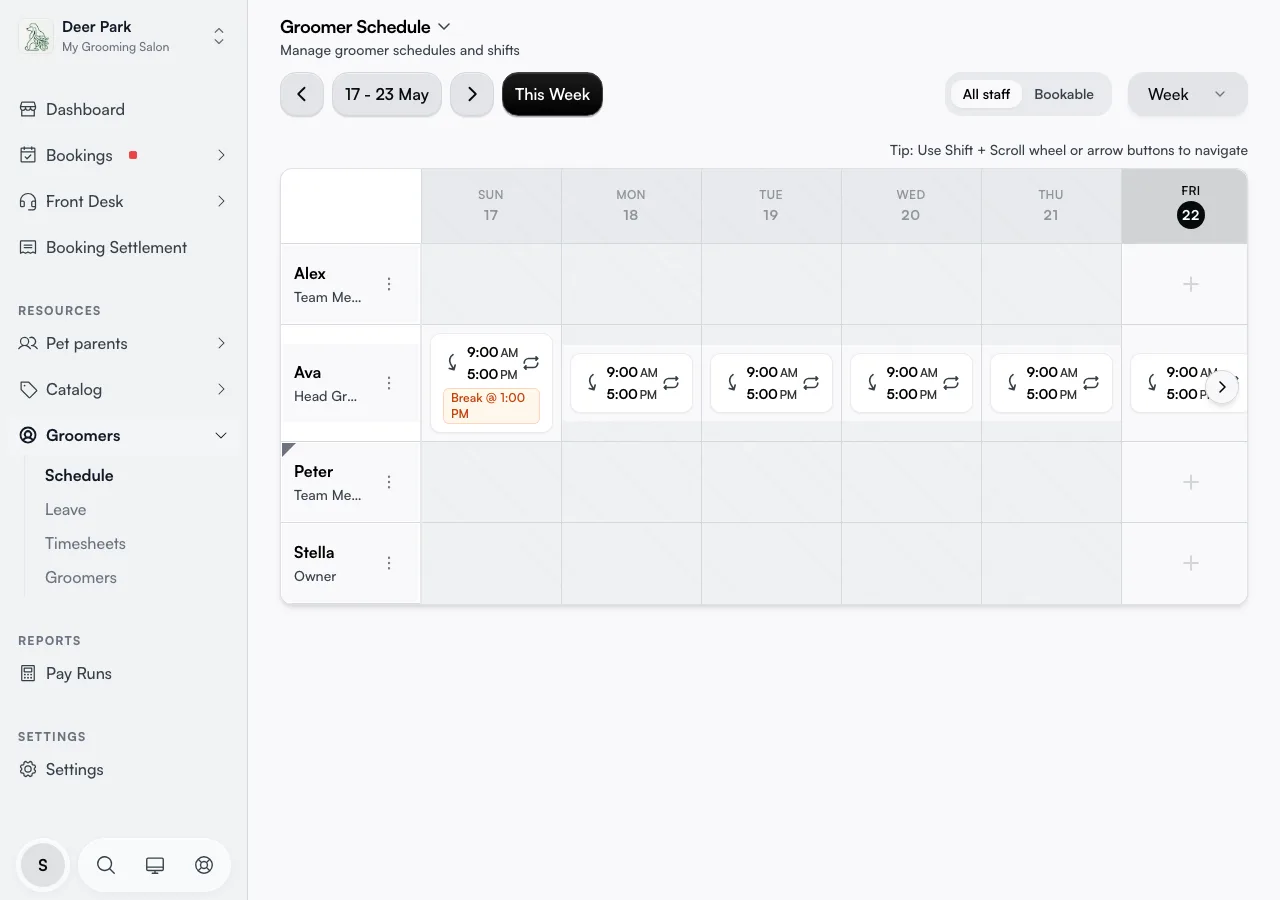
Find your way around the grid
Team members run down the left, dates run across the top, and each cell holds that person's shifts for that day. Use the view selector in the top right to switch between Week and Month, and the All staff / Bookable tabs to show everyone or only the people customers can book. Step through dates with the arrows, or click This Week (or This Month) to jump back to today. You can also click the date to open a mini-calendar and jump to any week at once.
Two markers are easy to miss. A small dark triangle in the top-left corner of a name means that person is not bookable — customers can't book them no matter how many hours they have. A repeat icon on a shift card means it's a recurring shift, not a one-off. The Schedule Guide (the page's help button) shows both side by side if you forget.
Set someone's normal working week
For the hours that repeat every week, open the ⋮ menu on the team member's name and choose Create regular shift.
The editor lays out all seven days at once. Set the start and end time for each working day, and turn on the break toggle to add a break with its own start time and length. Set the repeat to Weekly or Every 2 Weeks, then choose No end date for an ongoing pattern or a Specific date to stop it on a chosen day. Save, and the shift fills in across every matching cell going forward.
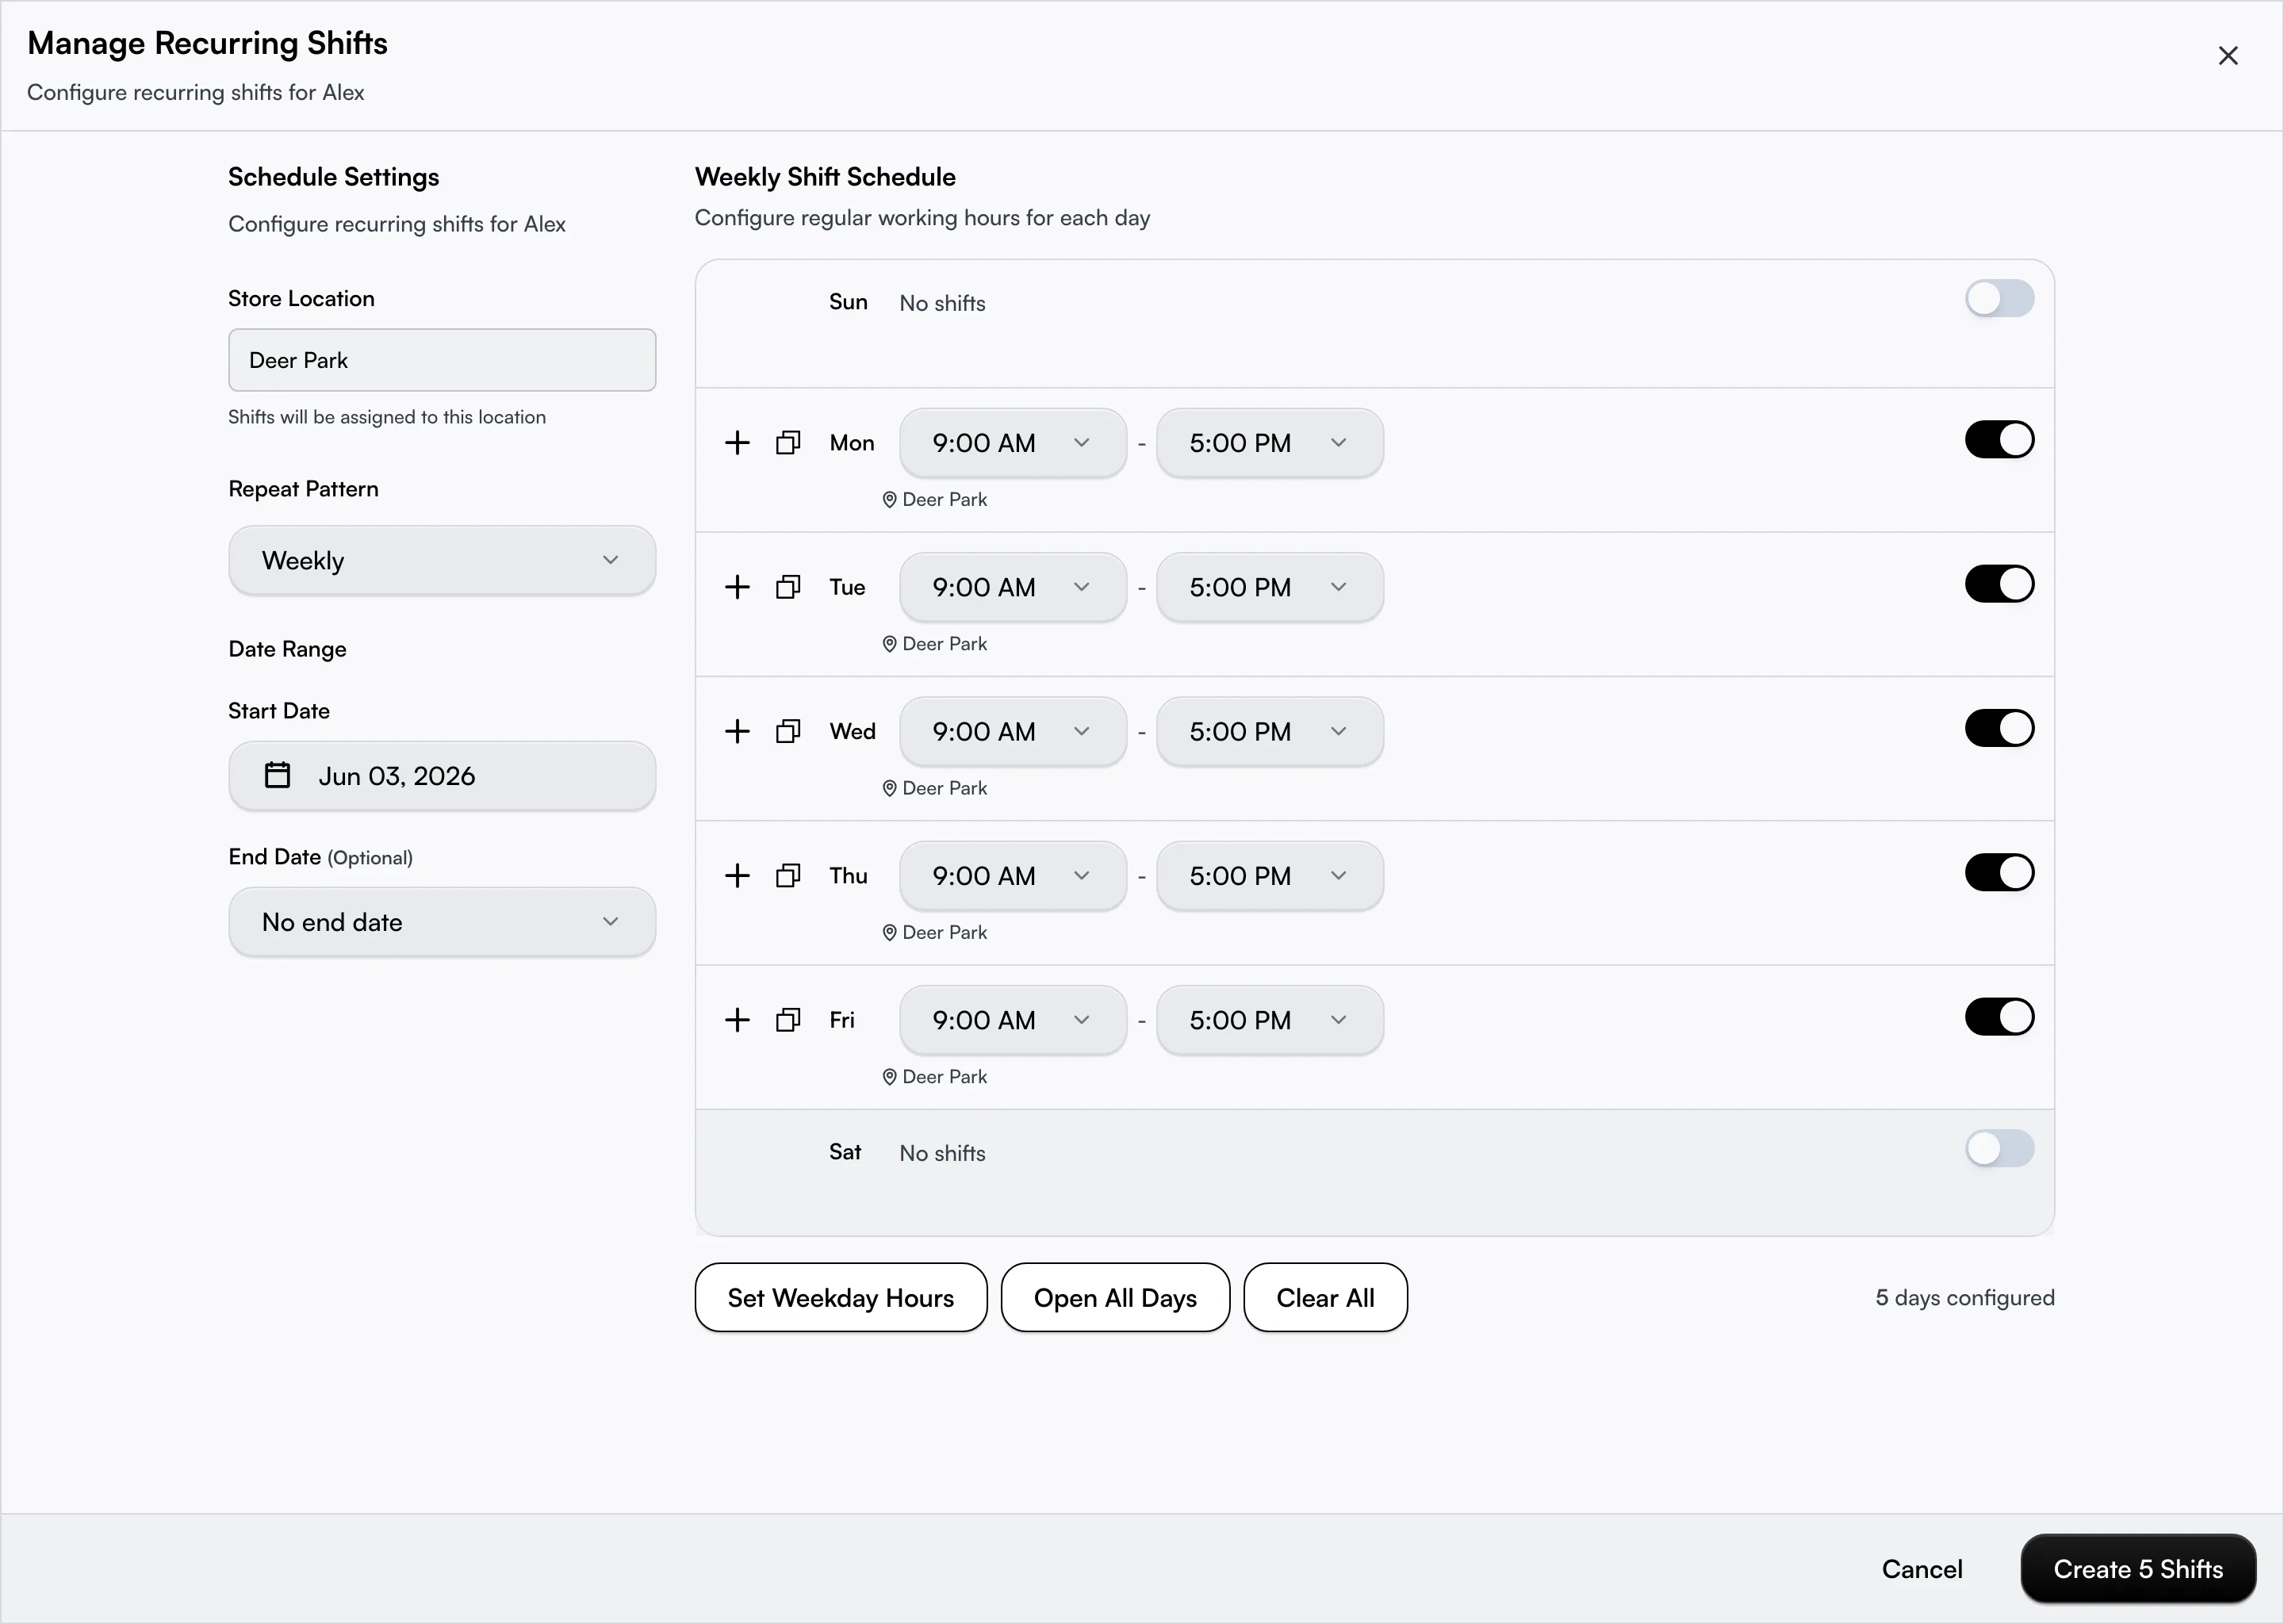
Build a week in two clicks instead of fourteen
Most owners set each day by hand and never notice the shortcuts at the top of the regular-shift editor:
- Set Weekday Hours fills Monday to Friday and clears the weekend — and it doesn't guess 9-to-5, it pulls your location's real opening hours.
- Open All Days does the same for all seven days.
- Clear All wipes the week so you can start over.
There's also a quieter one: once you've set up a single day exactly how you want it, copy that day to fill every other empty day with the same hours and break. It only touches days that have no shift yet, so it never overwrites work you've already done.
Add a one-off shift or cover day
For a single extra day, a cover shift, or a one-time change that shouldn't repeat, open the ⋮ menu and choose Create single shift, then pick the day. The menu shows the actual dates in view and marks Today; past days are greyed out because you can't roster backwards.
A one-off shift on a date that already has a recurring shift takes precedence for that day. That makes this the right tool for shortening or changing hours on one date without disturbing the whole pattern.
Edit one day or the whole pattern
Open any shift card to edit it. If it's part of a recurring pattern, the ⋮ menu inside gives you a choice: change just this date, or Edit entire series to reshape the whole pattern at once. The same menu offers Delete for a single shift or Delete all occurrences to remove the recurring shift everywhere.
Run shifts overnight or past midnight
If you set an end time earlier than the start (say 8pm to 2am), the schedule treats it as an overnight shift automatically — no separate setting. The only guard rail is a 16-hour cap: if the resulting shift is longer than that, you've almost certainly picked the end time before the start by mistake, and it won't save until you fix it. Breaks have to fall inside the shift window too, so a break that starts before the shift or runs past the end is rejected with a clear message.
Block a day off — and clear the bookings on it
To stop customers booking someone on a given day, open that day's shift and choose Mark as Leave. The day shows as a leave block and that person becomes unbookable for it.
If they already have appointments that day, leave is blocked until those bookings are dealt with. The shift shows each conflicting appointment, and Unassign All lifts the staff member off them in one step — the appointments stay on the calendar but need reassigning to someone else. For paid leave that needs sign-off, use the Leave page instead, which routes the request through an approval flow.
Schedule across multiple locations
If you run more than one location, the location selector at the top scopes the view, and each shift is tagged to a specific location. When you open a shift, a hint under the location name tells you that branch's opening hours for that day-of-week — handy for spotting a shift you've accidentally set outside the hours customers can actually arrive.
Shifts control where staff show up in availability — not just when. A staff member is only offered to customers at the location their shift is rostered at, for each day. If Alex's shift on Tuesday is at Glen Waverley, Alex won't appear in Deer Park's slot list on Tuesday, even if Deer Park is also open and Alex has the required skills. This is by design: it prevents customers from booking staff who won't actually be there.
When you create or edit a shift, the location field is required. Every shift must be assigned to a specific location — there is no "all locations" option. To roster a staff member at two locations on the same day, create two shifts (one per location).
Fix the skills gate without leaving the page
A common trap: someone has shifts but still no bookable slots, because they have no service skill. You don't have to go hunting — open the ⋮ menu on their name and choose Update skills to assign services right there. For inactive team members, an Enable Scheduling link appears next to the name; it flips their employment to active so they can be rostered, booked, and paid.
Tips
- A shift alone does not make someone bookable. Check they're set as bookable, have finished the welcome flow, and have at least one service skill (Update skills, from the name menu).
- A recurring week that skipped once usually has a one-off change on that date taking precedence. Open the cell to find it.
- Times follow the business timezone, so a 9 AM shift stays 9 AM through daylight-savings changes. If a time looks wrong, check the timezone under Settings → Business profile.
- Adding a shift in the past opens no slots — availability only counts forward from now, which is why past days are greyed out in the menus.
- No ⋮ menu on a name? Either every date in view is in the past, or your role doesn't include schedule-edit permission.
Related
- Team members — invite and configure the people you schedule.
- Leave and time off — paid leave that needs approval, rather than a quick block here.
- Staff welcome — what new team members finish before they appear here.
- Appointment calendar — where rostered shifts accept and show bookings.